Kubernetes 101
Kubernetes Mastery Guide: From Zero to Hero
Welcome! If you’ve ever wondered how big companies run their apps smoothly across thousands of computers, you’re about to discover their secret: Kubernetes. Whether you’re a student, developer, or just curious, this guide will walk you step-by-step from total beginner to confidently running real-world applications with Kubernetes. Let’s make this journey fun, practical, and easy to follow!
What is Kubernetes?
Imagine you’re the captain of a fleet of ships (your apps), and you need to make sure they all reach their destination safely, no matter the weather. Kubernetes is like your smart autopilot—it organizes, launches, and keeps your apps running smoothly, even if some ships (servers) break down. Created by Google and now run by a huge community, Kubernetes is the go-to tool for managing apps in the cloud.

How Does Kubernetes Work?
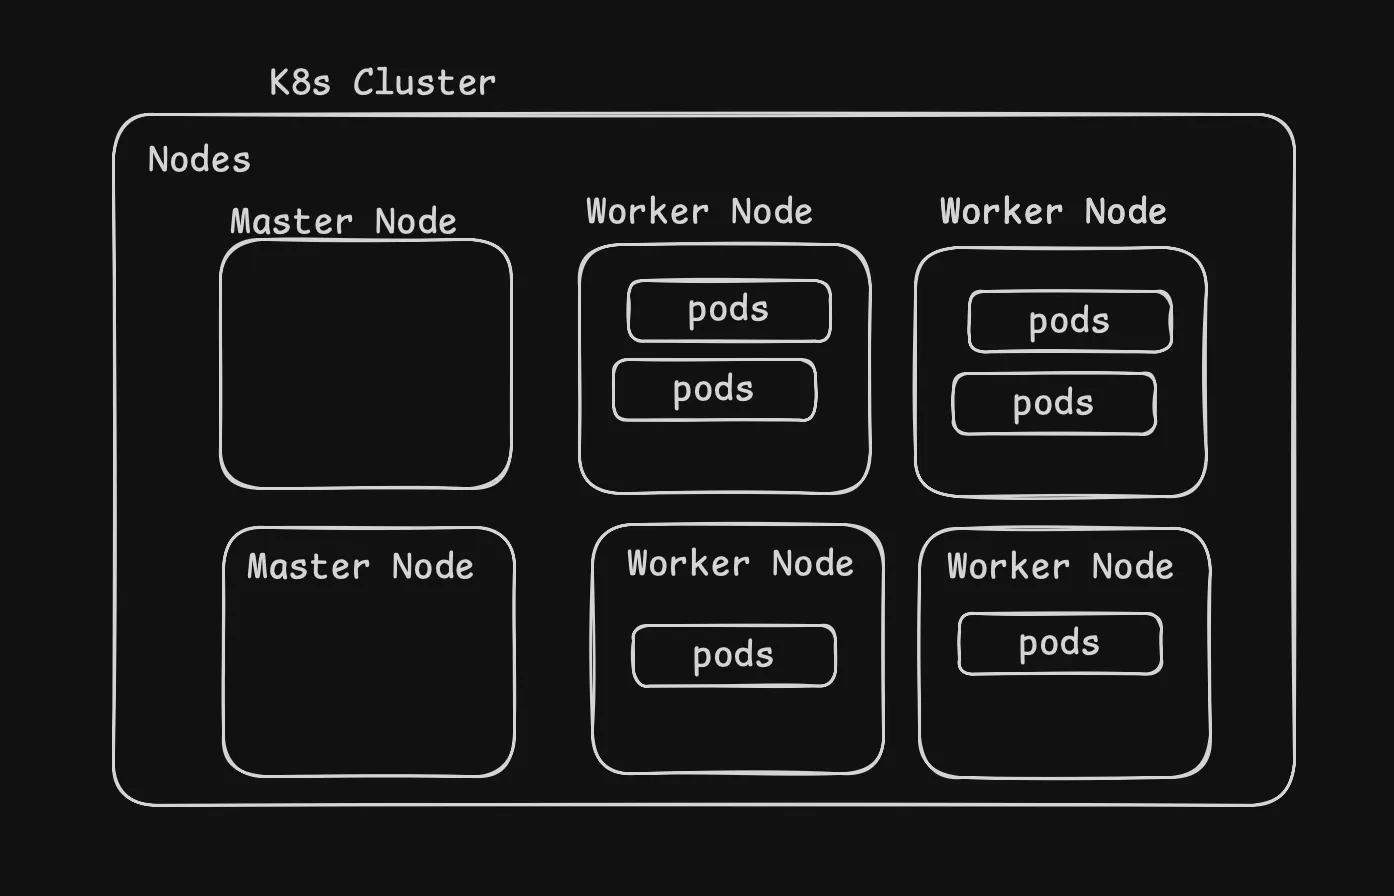
Think of Kubernetes as a team with two main roles:
- Control Plane: The brains of the operation. It decides what needs to be done and keeps track of everything.
- Worker Nodes: The muscle. These are the computers that actually run your apps.
Just like a coach and players, the control plane gives orders, and the worker nodes do the work.
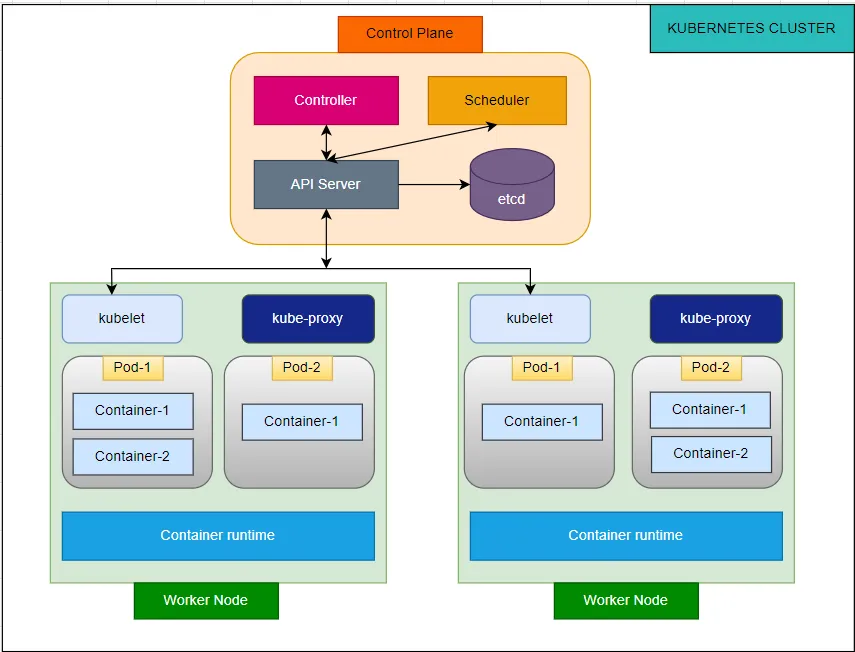
Control Plane Components
The control plane manages the overall state of the cluster:
| Component | Function | Responsibility |
|---|---|---|
| kube-apiserver | API Gateway | Exposes Kubernetes HTTP API and handles all requests |
| etcd | Distributed Database | Stores all cluster data and configuration |
| kube-scheduler | Pod Placement | Assigns pods to appropriate nodes based on resource requirements |
| kube-controller-manager | State Management | Runs controllers to maintain desired cluster state |
| cloud-controller-manager | Cloud Integration | Manages cloud provider-specific resources (optional) |
Worker Node Components
Worker nodes run your actual applications:
| Component | Function | Responsibility |
|---|---|---|
| kubelet | Node Agent | Communicates with control plane and manages pod lifecycle |
| kube-proxy | Network Proxy | Maintains network rules and enables service communication |
| Container Runtime | Container Execution | Runs containers (Docker, containerd, CRI-O) |
The Building Blocks: Pods, Deployments, and Services
- Pods: The smallest unit in Kubernetes. Imagine a pod as a box that holds one or more containers (mini-apps) that need to work together.
- Deployments: Like a manager, deployments make sure the right number of pods are running and handle updates or rollbacks if something goes wrong.
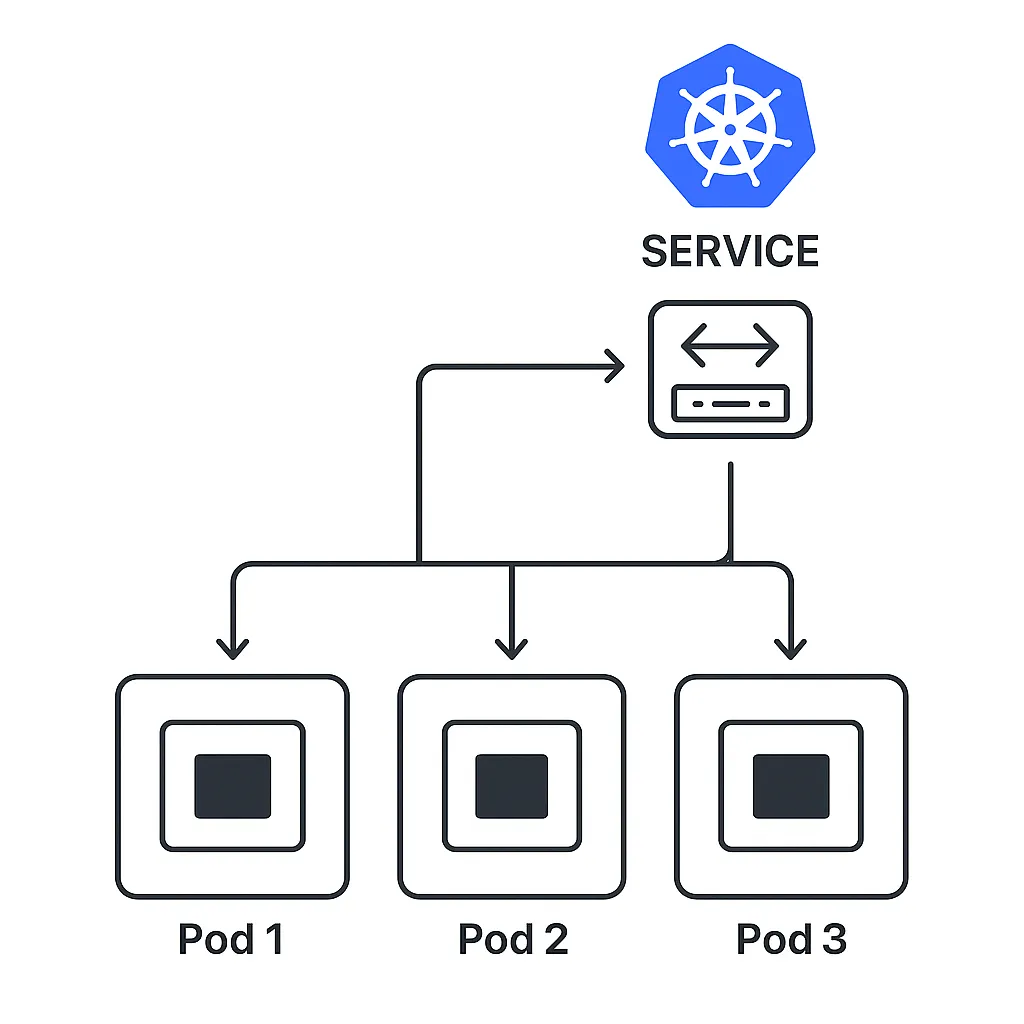
- Services: These are like phone numbers for your pods. No matter how many times pods change, services make sure you can always reach your app.
Basic Pod Configuration:
apiVersion: v1
kind: Pod
metadata:
  name: my-first-pod
  labels:
    app: nginx
spec:
  containers:
  - name: nginx-container
    image: nginx:1.21
    ports:
    - containerPort: 80
    resources:
      limits:
        memory: "128Mi"
        cpu: "250m"
      requests:
        memory: "64Mi"
        cpu: "100m"
Deployment Configuration Example:
apiVersion: apps/v1
kind: Deployment
metadata:
  name: nginx-deployment
  labels:
    app: nginx
spec:
  replicas: 3
  selector:
    matchLabels:
      app: nginx
  template:
    metadata:
      labels:
        app: nginx
    spec:
      containers:
      - name: nginx
        image: nginx:1.21
        ports:
        - containerPort: 80
        resources:
          limits:
            memory: "256Mi"
            cpu: "500m"
          requests:
            memory: "128Mi"
            cpu: "250m"
Key Deployment Features:
- Automatic scaling based on defined replica count
- Rolling updates for zero-downtime deployments
- Rollback capabilities to previous versions
- Health monitoring and automatic pod replacement
Services: Network Connectivity and Load Balancing Services provide stable network endpoints for accessing pods. They abstract away the dynamic nature of pods and provide load balancing across multiple instances.
Service Types:
| Service Type | Use Case | Accessibility |
|---|---|---|
| ClusterIP | Internal cluster communication | Cluster-internal only |
| NodePort | External access via node ports | External via node IP:port |
| LoadBalancer | Cloud load balancer integration | External via load balancer |
| ExternalName | DNS name mapping | External service mapping |
ClusterIP Service Example:
apiVersion: v1
kind: Service
metadata:
  name: nginx-service
spec:
  selector:
    app: nginx
  ports:
    - protocol: TCP
      port: 80
      targetPort: 80
  type: ClusterIP
NodePort Service Example:
apiVersion: v1
kind: Service
metadata:
  name: nginx-nodeport-service
spec:
  selector:
    app: nginx
  ports:
    - protocol: TCP
      port: 80
      targetPort: 80
      nodePort: 30080
  type: NodePort
Keeping Secrets and Settings Safe
- ConfigMaps: Store settings like “debug mode: on” or “database URL.” Think of them as sticky notes for your app.
- Secrets: Store passwords and keys. These are locked away so only your app can see them.
ConfigMap Example:
apiVersion: v1
kind: ConfigMap
metadata:
  name: app-config
data:
  database_url: "postgresql://db:5432/myapp"
  debug_mode: "true"
  max_connections: "100"
Secret Example:
apiVersion: v1
kind: Secret
metadata:
  name: app-secret
type: Opaque
data:
  username: YWRtaW4=  # base64 encoded 'admin'
  password: cGFzc3dvcmQ=  # base64 encoded 'password'
Complete Application Example
Here’s a comprehensive deployment that combines all concepts:
apiVersion: apps/v1
kind: Deployment
metadata:
  name: web-app-deployment
  labels:
    app: web-app
spec:
  replicas: 2
  selector:
    matchLabels:
      app: web-app
  template:
    metadata:
      labels:
        app: web-app
    spec:
      containers:
      - name: web-app
        image: nginx:1.21
        ports:
        - containerPort: 80
        env:
        - name: DATABASE_URL
          valueFrom:
            configMapKeyRef:
              name: app-config
              key: database_url
        - name: USERNAME
          valueFrom:
            secretKeyRef:
              name: app-secret
              key: username
        - name: PASSWORD
          valueFrom:
            secretKeyRef:
              name: app-secret
              key: password
        resources:
          limits:
            memory: "512Mi"
            cpu: "500m"
          requests:
            memory: "256Mi"
            cpu: "250m"
        volumeMounts:
        - name: config-volume
          mountPath: /etc/config
      volumes:
      - name: config-volume
        configMap:
          name: app-config
Your Magic Wand: kubectl
Meet kubectl, the command-line tool that lets you talk to Kubernetes. With simple commands, you can check your cluster, launch apps, fix problems, and more. It’s like having a remote control for your cloud!
Basic Syntax:
kubectl [command] [TYPE] [NAME] [flags]Most Important Commands:
# Cluster and Node Information
kubectl get nodes
kubectl cluster-info

# Pod Management
kubectl get pods
kubectl get pods -o wide
kubectl describe pod <pod-name>
kubectl logs <pod-name>
kubectl exec -it <pod-name> -- /bin/bash

# Application Deployment
kubectl apply -f <file.yaml>
kubectl delete -f <file.yaml>
kubectl get deployments
kubectl scale deployment <name> --replicas=5

# Service Management
kubectl get services
kubectl port-forward <pod-name> 8080:80

# Monitoring and Troubleshooting
kubectl top nodes
kubectl top pods
kubectl get events
kubectl rollout status deployment/<name>
Try It Yourself: Setting Up Kubernetes Locally
Want to practice without breaking anything? Use Minikube! It lets you run Kubernetes on your own computer. You can experiment, learn, and see how everything works before going live.
# Install and start Minikube
minikube start

# Enable dashboard
minikube dashboard

# Get cluster status
kubectl cluster-info
Kubernetes Dashboard
The Kubernetes Dashboard provides a web-based UI for cluster management.
Installation:
# Install dashboard
kubectl apply -f https://raw.githubusercontent.com/kubernetes/dashboard/v2.7.0/aio/deploy/recommended.yaml

# Create service account
kubectl create serviceaccount dashboard-user -n kubernetes-dashboard

# Create cluster role binding
kubectl create clusterrolebinding dashboard-user --clusterrole=cluster-admin --serviceaccount=kubernetes-dashboard:dashboard-user

# Get access token
kubectl create token dashboard-user -n kubernetes-dashboard

# Start proxy
kubectl proxyDeploy Your First App: Step-by-Step
Ready to get your hands dirty? Here’s how to launch a real app:
- Create a namespace (a playground for your app).
- Set up your app’s settings and secrets.
- Deploy your app and connect it to the internet.
- Check that everything is running smoothly.
Step 1: Create Namespace
kubectl create namespace my-app
kubectl config set-context --current --namespace=my-app
Step 2: Deploy ConfigMap and Secret
kubectl apply -f - <<EOF
apiVersion: v1
kind: ConfigMap
metadata:
  name: app-config
data:
  environment: "development"
  api_url: "https://api.example.com"
---
apiVersion: v1
kind: Secret
metadata:
  name: app-secret
type: Opaque
data:
  api_key: $(echo -n "your-secret-key" | base64 -w 0)
EOF
Step 3: Deploy Application
kubectl apply -f - <<EOF
apiVersion: apps/v1
kind: Deployment
metadata:
  name: my-web-app
spec:
  replicas: 3
  selector:
    matchLabels:
      app: my-web-app
  template:
    metadata:
      labels:
        app: my-web-app
    spec:
      containers:
      - name: web-app
        image: nginx:1.21
        ports:
        - containerPort: 80
        envFrom:
        - configMapRef:
            name: app-config
        - secretRef:
            name: app-secret
---
apiVersion: v1
kind: Service
metadata:
  name: my-web-app-service
spec:
  selector:
    app: my-web-app
  ports:
  - port: 80
    targetPort: 80
  type: ClusterIP
EOF
Step 4: Verify Deployment
# Check deployment status
kubectl get deployments
kubectl rollout status deployment/my-web-app

# Check pods
kubectl get pods -l app=my-web-app

# Check service
kubectl get services

# Test connectivity
kubectl port-forward service/my-web-app-service 8080:80
Growing and Updating Your App
Need more power? Scale up with a single command. Want to update your app? Roll out changes without downtime. Kubernetes makes it easy to grow and improve your app on the fly.
Horizontal Scaling
# Scale up
kubectl scale deployment my-web-app --replicas=5

# Auto-scaling with HPA
kubectl autoscale deployment my-web-app --cpu-percent=50 --min=1 --max=10
Rolling Updates
# Update image
kubectl set image deployment/my-web-app web-app=nginx:1.22

# Check rollout status
kubectl rollout status deployment/my-web-app

# Rollback if needed
kubectl rollout undo deployment/my-web-app
Pro Tips for Real-World Success
- Set limits so your app doesn’t hog resources.
- Add health checks so Kubernetes knows when to restart things.
- Use security features to keep your data safe.
- Monitor everything so you catch problems early.
Resource Management
Always define resource requests and limits:
resources:
  limits:
    memory: "512Mi"
    cpu: "500m"
  requests:
    memory: "256Mi"
    cpu: "250m"
Health Checks
Implement liveness and readiness probes:
livenessProbe:
  httpGet:
    path: /health
    port: 80
  initialDelaySeconds: 30
  periodSeconds: 10
readinessProbe:
  httpGet:
    path: /ready
    port: 80
  initialDelaySeconds: 5
  periodSeconds: 5
Security Considerations
- Use non-root containers when possible
- Implement RBAC for access control
- Use Secrets for sensitive data
- Enable Pod Security Standards
- Regular security scanning of images
Monitoring and Logging
Essential for production environments:
- Prometheus for metrics collection
- Grafana for visualization
- ELK Stack or Loki for log aggregation
- Jaeger for distributed tracing
Fixing Problems Like a Pro
If something breaks, don’t panic! Use kubectl to check logs, see what’s running, and debug issues. Kubernetes gives you all the tools to find and fix problems fast.
Pod Issues
# Check pod status
kubectl get pods
kubectl describe pod <pod-name>

# Check logs
kubectl logs <pod-name>
kubectl logs <pod-name> --previous

# Debug running pod
kubectl exec -it <pod-name> -- /bin/sh
Service Issues
# Check service endpoints
kubectl get endpoints <service-name>

# Test service connectivity
kubectl run debug --image=busybox -it --rm -- sh
# Inside pod: wget -qO- <service-name>.<namespace>.svc.cluster.local
Resource Issues
# Check resource usage
kubectl top nodes
kubectl top pods

# Check resource quotas
kubectl describe resourcequota
Conclusion
Kubernetes is changing the way the world runs software. With millions of developers and companies using it, learning Kubernetes opens doors to exciting opportunities. Dive in, experiment, and soon you’ll be managing powerful apps with confidence!
Key takeaways:
- Kubernetes simplifies container orchestration at scale
- Understanding the architecture is crucial for effective usage
- Practice with real deployments builds confidence
- Production readiness requires attention to security, monitoring, and best practices
With 5.6 million developers already using Kubernetes and 96% of organizations evaluating or using it, now is the perfect time to master this essential technology. Start your journey today with local experiments, and soon you’ll be confidently managing production workloads in the cloud.